
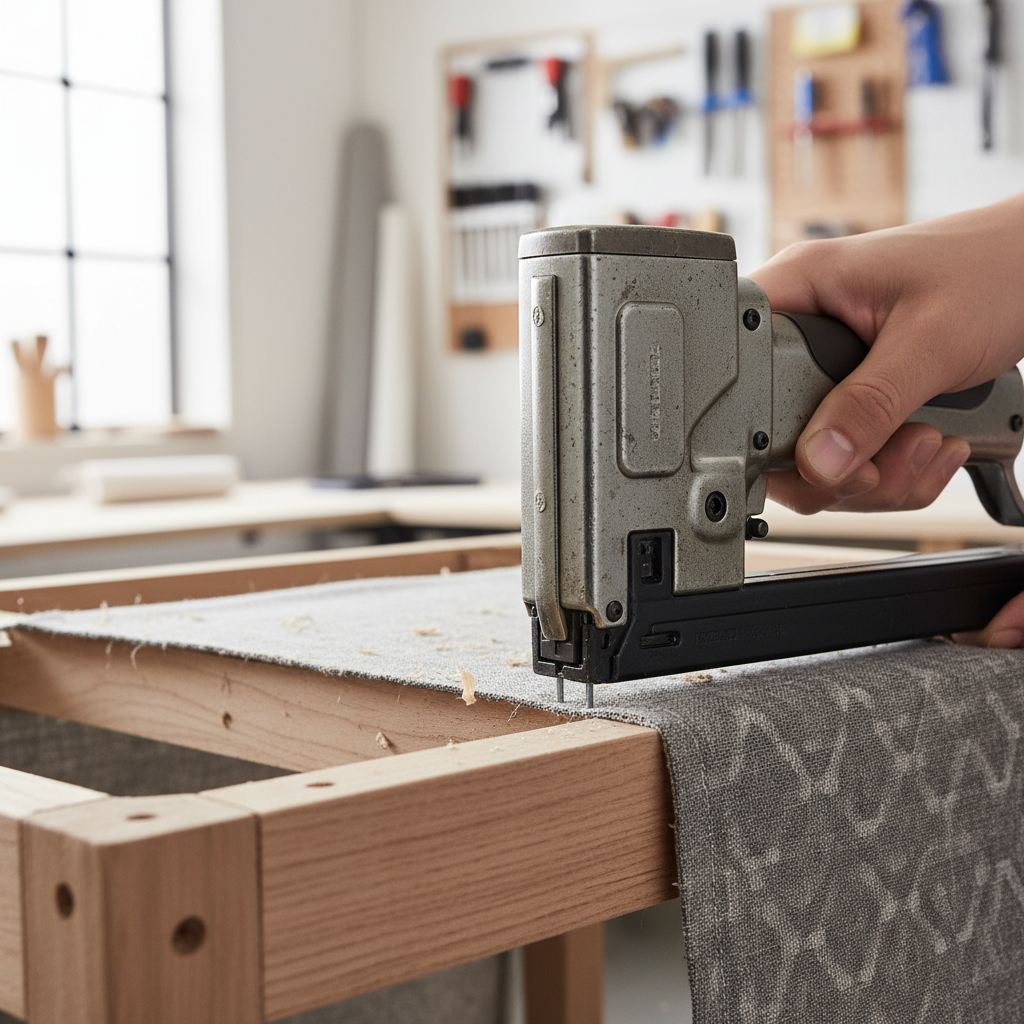
staple gun heavy duty upholstery is the tool people reach for when fabric, webbing, or thin leather laughs at a light stapler, but it’s also where most “why won’t this sink?” frustration shows up.
If you’re reupholstering dining chairs, rebuilding a boat cushion, or stretching fabric on a headboard, the staple gun matters as much as the staple size and the material under it. A heavy-duty model can save hours, but only when the setup matches the job.
This guide breaks down what “heavy duty” really means in upholstery work, how to pick staples and power type, quick self-checks when things go sideways, and practical technique tips so your staples sit flush and your fabric stays clean.
What “Heavy Duty” Means for Upholstery (and What It Doesn’t)
In upholstery, “heavy duty” usually points to two things: the stapler can drive longer staples consistently, and it has enough power to sink them into hardwood or layered materials without constant retries.
What it doesn’t automatically mean is “works on everything.” Foam density, fabric weave, tack strip, plywood vs oak, and staple crown width all change the outcome, even with a powerful tool.
- Drive power: Enough force to seat staples flush, especially into hardwood frames.
- Staple format compatibility: Many upholstery projects rely on narrow crown staples (common for fabric and trim), but some jobs prefer wider crown for holding power on webbing.
- Jam resistance and access: Nose design, magazine quality, and easy clearing matter more than people expect.
According to OSHA, tools that drive fasteners can create puncture and eye-injury risks, so eye protection and safe handling habits are worth treating as part of the “right tool.”
Common Reasons a Staple Gun Struggles on Upholstery Jobs
Most problems that get blamed on the stapler are really a mismatch between staple length, material, and power source. If your staple gun heavy duty upholstery setup still misbehaves, these causes show up a lot in real projects.
1) Wrong staple length for the substrate
Too short, and the staple barely bites. Too long, and it can curl, blow out the side, or sit proud because it meets too much resistance.
2) Staple type mismatch (crown width and gauge)
Upholstery work often favors narrow crown for neatness. Webbing and structural holds may need a wider crown to spread load. Using the wrong crown can lead to tearing, puckering, or weak hold.
3) Material stack is tougher than expected
Fabric + batting + dust cover + webbing adds up fast. A staple that sinks into bare pine can suddenly sit high once you add layers.

4) Tool power or pressure is off
Manual heavy-duty guns need consistent hand force and good leverage. Electric models can bog down on dense material. Pneumatic models may underperform if the compressor pressure is low, the hose is too restrictive, or the tool needs lubrication.
5) Technique issues that look like “bad hardware”
Angle drift, nose not fully seated, or firing into knots can cause proud staples and weird staple legs. The tool might be fine.
Quick Self-Check: Are You Choosing the Right Setup?
If you want a fast reality check before buying a new tool, run this list. It usually narrows the problem in five minutes.
- Wood type: Is the frame hardwood (oak/maple) or softer pine/plywood?
- Layer count: How many layers are you stapling through (fabric, batting, webbing, dust cover)?
- Staple length: Are you using longer legs to “make up for” weak holding power?
- Staple crown: Narrow crown for clean trim, wider crown for webbing hold?
- Staple seating: Are staples sitting proud, or are legs bending/curling?
- Work angle: Can you hold the nose flat against the frame everywhere you staple?
- Frequency: Are you doing a few chairs a year, or daily upholstery work?
Key point: If staples are consistently proud in hardwood even with correct staples, that’s when a pneumatic stapler often becomes the practical answer.
Choosing a Heavy-Duty Staple Gun for Upholstery: Manual vs Electric vs Pneumatic
There’s no universally “best” category. The right pick depends on how tough your materials are and how much stapling you do in one session.
| Type | Best for | Pros | Tradeoffs |
|---|---|---|---|
| Manual heavy-duty | Small projects, occasional repairs | No power source, low cost, portable | Hand fatigue, inconsistent sink depth in hardwood |
| Electric (corded/battery) | Medium DIY volume, consistent softwood use | Less fatigue, steadier drive than manual | May struggle on dense frames; battery models vary |
| Pneumatic | Frequent work, hardwood frames, thick stacks | Strong drive, speed, consistent results | Needs compressor/air setup, maintenance, more noise |
If your staple gun heavy duty upholstery workflow involves webbing, tack strip, or hardwood chair frames, many people end up happiest with pneumatic because it reduces “second shot” staples and fabric rework.
Staples Matter More Than People Think (Size, Crown, and Material)
Staples are where upholstery jobs quietly succeed or fail. If you only change one variable, change staples before you change the tool.
How to think about staple length
- Trim fabric to frame: Often shorter legs work cleaner, especially near edges.
- Batting and thicker stacks: You may need longer legs, but only as long as the wood can accept without blowout.
- Webbing: Typically benefits from enough leg length to resist pull, plus a crown that spreads load.
Consider stainless or corrosion-resistant staples
For marine upholstery or humid areas, corrosion resistance becomes a real concern. Rust can stain fabric and weaken hold over time, so stainless staples are commonly used in those settings, even though they cost more.
According to the U.S. Consumer Product Safety Commission (CPSC), safe product use includes following manufacturer instructions; for staplers that guidance often includes compatible staple series, which is an easy detail to ignore until jams start.
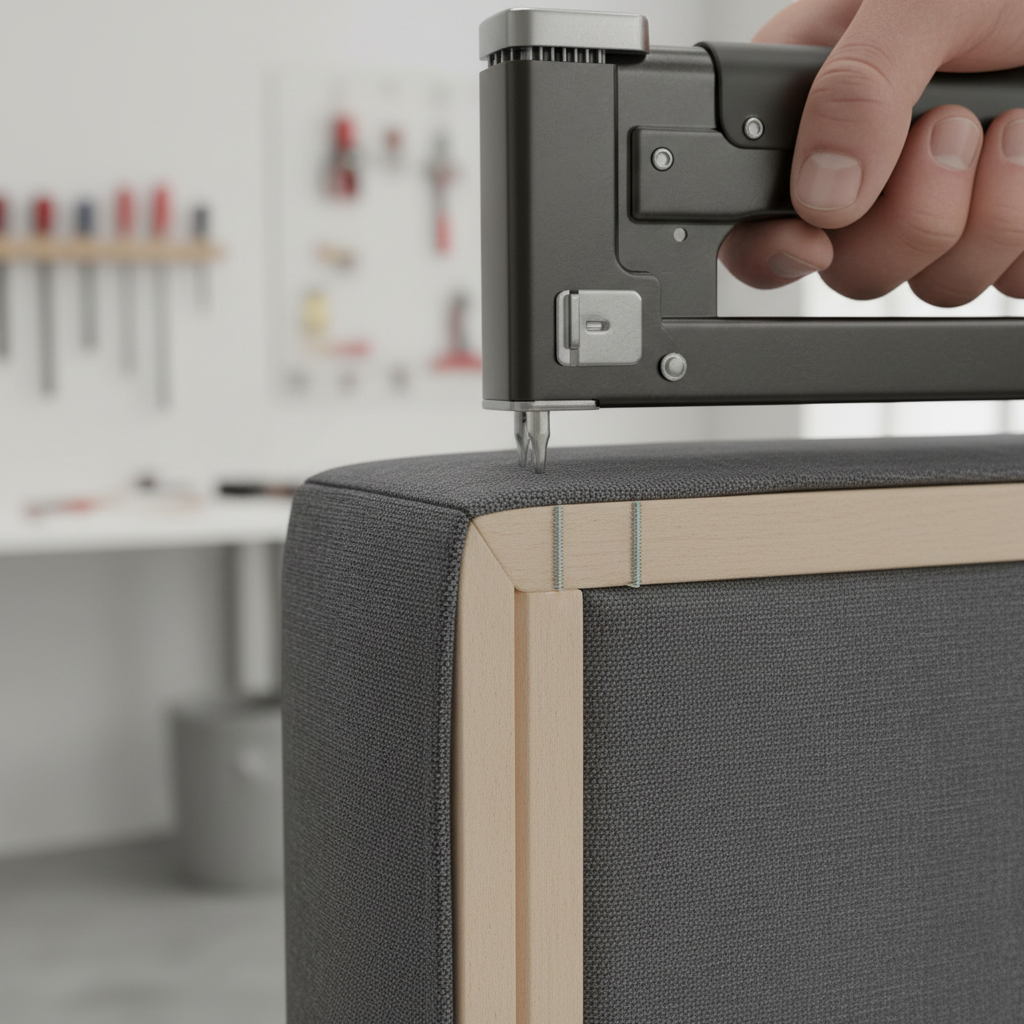
Practical Technique: How to Get Cleaner, Flatter Staples
The biggest leap in results often comes from technique, not force. Try these before you assume your stapler can’t handle upholstery work.
- Seat the nose fully: Press the nose flat and firmly to the wood before firing, especially on curved chair rails.
- Keep a consistent angle: Slight angle shifts can make one leg hit dense grain and kick out.
- Work from the center out: On panels and seats, anchor center points, then stretch evenly to corners to avoid wrinkles.
- Use a mallet as a backup: For occasional proud staples, a light tap can finish seating, but if every staple needs this, your setup is off.
- Plan staple spacing: Too sparse leads to loose fabric, too dense can weaken the edge and create puckers.
Troubleshooting: Fix Jams, Proud Staples, and Blowouts Without Guessing
If your staple gun heavy duty upholstery work keeps stalling, use symptoms to guide the fix instead of changing everything at once.
Proud staples (not fully sunk)
- Try a shorter staple length, especially on hardwood or near edges.
- Reduce material stack where possible (trim batting bulk at folds).
- For pneumatic, verify pressure and airflow; for electric, check whether it’s rated for your staple size.
Staples curling or legs crossing
- Staples may be too long for the wood density or you’re hitting knots.
- Check you’re using the exact staple series your stapler expects.
- Slow down and keep the nose square to the surface.
Staples blowing out the side of the frame
- Angle is likely off, or the frame edge is too thin for that staple length.
- Move the staple line inward, or switch to shorter legs near edges.
- If the frame is cracked or thin, consider reinforcement; a professional upholsterer might be the safer call.
Frequent jams
- Inspect the magazine for bent staples and debris.
- Use better-quality staples; cheap staples vary in leg alignment.
- If pneumatic, add tool oil if your manual recommends it, and drain compressor moisture as needed.
Safety Notes and When It’s Worth Getting Professional Help
Staplers are small tools with sharp outcomes. Wear eye protection, keep your free hand clear of the exit path, and treat test shots as normal, not optional.
If you’re working on antiques, high-value pieces, or anything structural like recliner mechanisms, a wrong staple line can tear fabric or damage a frame fast. Also, if you suspect mold, pest damage, or degraded foam, it may be worth consulting a professional upholsterer because material handling can carry health risks depending on the condition.
Conclusion: A Reliable Upholstery Finish Comes From Matching Tool, Staples, and Technique
A heavy-duty stapler earns its keep when it matches your material stack and your frame wood, and when the staples are the right series and length, not just “whatever fits.” Once that baseline is right, small technique tweaks usually turn a frustrating job into a clean, repeatable result.
If you want one practical next step, do a short test on scrap wood that matches your frame, then adjust staple length before you upgrade tools. If you’re doing multiple pieces or battling hardwood every weekend, consider stepping up to pneumatic for consistency.
FAQ
- What staple size is typically used for upholstery?
Many upholstery tasks use narrow crown staples in shorter to mid lengths, but the “right” size depends on fabric thickness and frame wood. When in doubt, test on scrap and look for a flush seat without blowout. - Is a manual heavy-duty stapler enough for chair upholstery?
For softwood frames and light fabric, it often works fine. If you hit hardwood or thick layers and you’re seeing proud staples, electric or pneumatic tools usually reduce rework. - Why does my staple gun jam only on certain staples?
Staplers are picky about staple series and tolerances. If staples aren’t the compatible format, or if they’re slightly bent or inconsistent, jams become common even when the tool is otherwise fine. - How do I stop staples from poking through fabric?
This usually comes from stapling too close to an edge, using staples that are too long, or pulling fabric so tight it thins at the line. Shorter staples and a slightly adjusted staple line often fix it. - Can I use a heavy-duty staple gun on leather or vinyl?
Often yes, but leather and vinyl can show every mistake. Test spacing and tension, and consider corrosion-resistant staples in humid environments. If the material is expensive, a few careful test shots pay for themselves. - Do I need stainless staples for outdoor cushions?
In many outdoor or marine-adjacent settings, stainless is a common choice to reduce rust staining and corrosion, though specifics depend on exposure and fabric type. If you’re unsure, ask the cushion maker or a local upholstery shop. - How do I know if I should switch to pneumatic?
If you’re doing frequent upholstery work, fighting hardwood, or tapping in a large share of staples by hand, pneumatic usually brings more consistent sink depth and speed.
If you’re working through recurring jams or staples that won’t sit flush, and you’d rather not guess your way through staple series, lengths, and tool types, a simple checklist for your materials and project use-case can make the next purchase feel a lot less random.