
how to use a hole punch for leather crafts is mostly about control: picking the right punch, supporting the leather, and striking or squeezing in a way that stays straight and repeatable.
If you’ve ever ended up with oval holes, torn edges, or spacing that looks “off” once hardware goes in, it’s rarely because you’re “bad at leather.” It’s usually a tool mismatch, a soft work surface, or a technique issue that compounds across a line of holes.
This guide stays practical, you’ll learn what tool to use for which job, how to mark and punch clean holes, and how to fix the two problems that waste the most time: dull punches and drifting alignment.
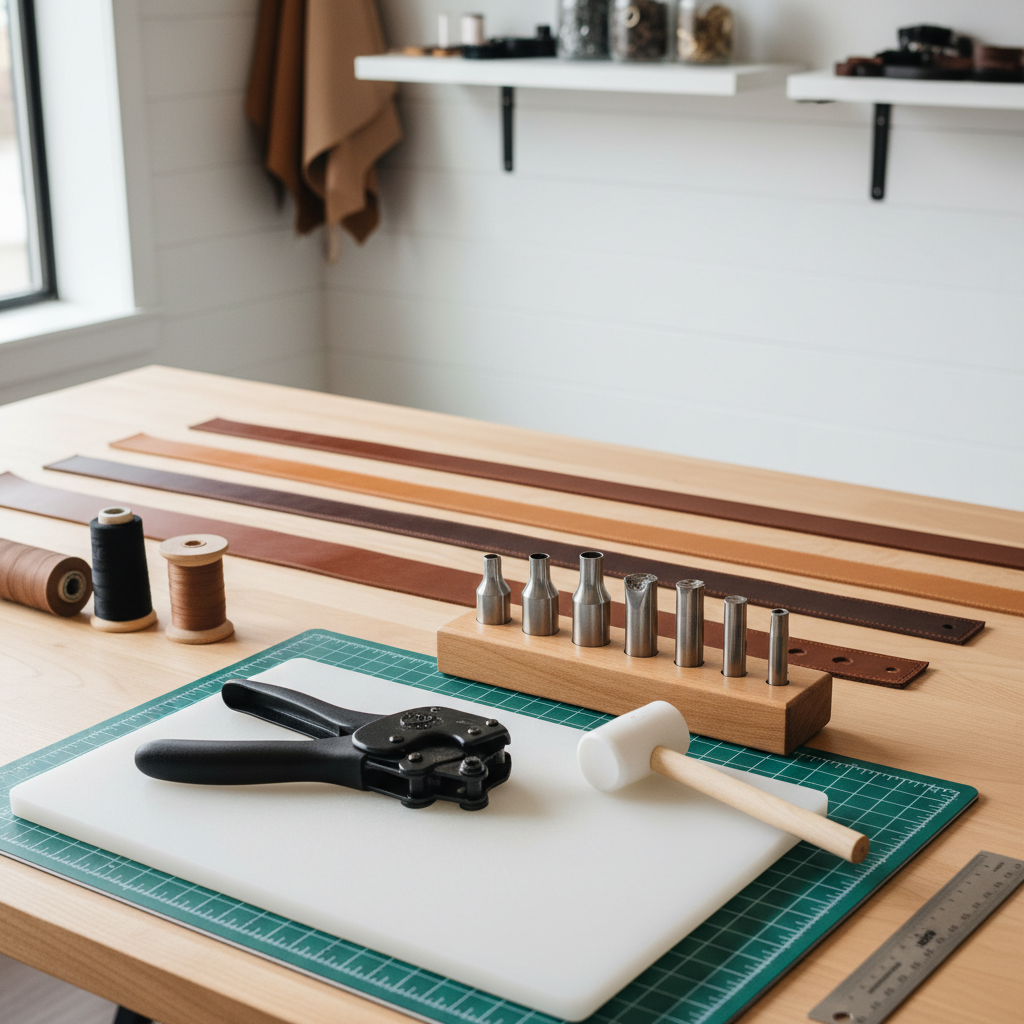
Choose the right hole punch for the job
People say “hole punch” and mean three different tools. Using the wrong one is the fastest path to ragged holes or wrist fatigue.
Common punch types (and where they shine)
- Rotary hole punch: Great for belts, straps, and light-to-medium leather when you need standard round sizes fast. Less ideal on very thick veg-tan.
- Drive punch (tube punch): The most consistent round holes, especially on thicker leather. Needs a mallet and proper backing.
- Plier punch / single-size hand punch: Useful for quick field repairs, snaps on lighter goods, or tight spaces, but leverage can be limited.
- Pricking irons / stitching chisels: For stitch holes that become slits, not round holes. Not a replacement for hardware holes.
If you’re making straps and belts, you can do a lot with a rotary punch, but a drive punch often gives a cleaner edge on thicker stock. For hardware holes (rivets, snaps, Chicago screws), consistency matters more than speed.
Quick sizing cheat sheet
Exact sizes vary by brand and hardware maker, so treat this as a starting point and test on scrap.
| Use case | Typical hole style | What to test-fit |
|---|---|---|
| Belts (tongue holes) | Round | Belt prong passes smoothly without tearing |
| Rivets & double-cap rivets | Round | Post fits snug, sets without mushrooming sideways |
| Snaps | Round | Post seats fully, cap doesn’t wobble |
| Chicago screws | Round | Barrel slides through without forcing |
| Hand stitching | Slit/angled | Needle passes cleanly, stitch sits centered |
Set up your workspace so holes cut cleanly
Clean holes come from support under the leather. If the surface flexes, the punch compresses fibers instead of cutting them, so edges look fuzzy or torn.
- Backing surface: Use a poly cutting board, end-grain punch pad, or thick HDPE. Avoid concrete, metal, or bare wood you care about.
- Stability: Work on a solid table that won’t bounce when you strike.
- Lighting: Strong overhead light helps you keep the tool vertical and spot drift early.
- Scrap for testing: Keep a strip of the same leather and same number of layers for test holes.
According to OSHA, employers should reduce exposure to flying particles and impact hazards when using hand tools, which maps neatly to home leathercraft: eye protection is a sensible default when striking punches, especially on rivet-heavy projects.
Mark and align holes so they look intentional
Most “messy” holes are actually fine individually, they just wander. Spacing and alignment make the project look professional.
Marking methods that hold up
- Wing divider: Best for consistent distance from an edge, especially on straps.
- Stitching groover or crease line: Creates a track you can visually follow.
- Ruler + scratch awl: Simple and accurate when you need specific measurements.
- Template: Great for repeatable patterns, like watch straps or bag tabs.
A practical habit: mark the first and last hole, then fill the middle. It reduces the “oops, I’m off by a millimeter every time” creep that shows up after six holes.
Alignment checks before you punch
- Hold the leather at eye level and confirm the marks form a straight line.
- Dry-fit hardware on top of the marks, not after punching.
- If punching through multiple layers, clip or tape the stack so it can’t shift.
How to punch holes: rotary punch vs drive punch
Technique changes slightly by tool, but the goal stays the same: a clean cut with minimal distortion.
Rotary hole punch: clean holes without crushed edges
- Pick the correct tube size and rotate until it locks firmly in position.
- Place leather on a firm backing board, not mid-air.
- Keep the punch perpendicular to the leather, then squeeze smoothly instead of snapping closed.
- If the tool struggles, stop and check sharpness or thickness rather than forcing harder.
When people ask how to use a hole punch for leather crafts and complain about “crescent moons” instead of circles, it’s often a rotary punch that isn’t fully seating the tube, either because the tube is dull or the leather is too thick for that punch style.
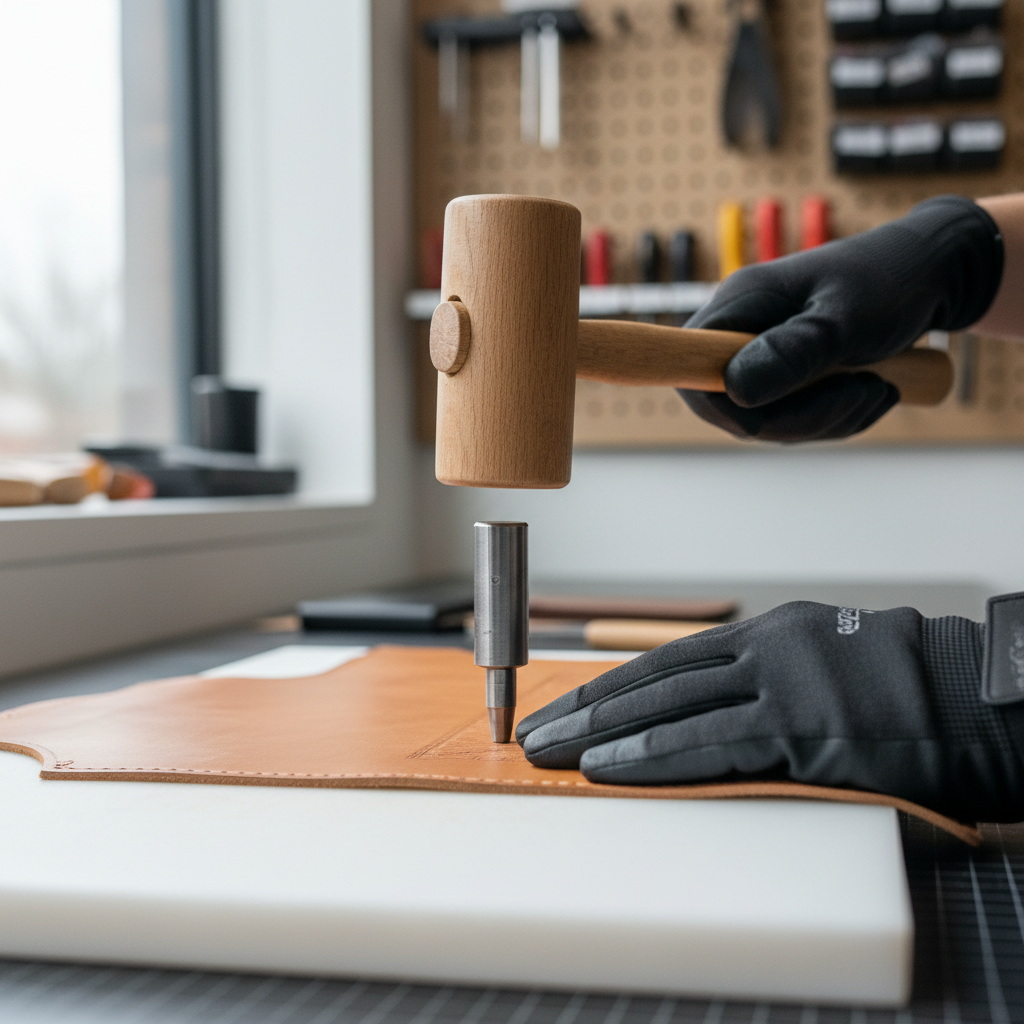
Drive punch: the most consistent round holes
- Set leather on a punch pad or HDPE board.
- Place the punch on your mark, then lightly twist to “bite” the surface and prevent skating.
- Strike with a mallet using controlled force, usually one solid hit beats three weak taps.
- Lift straight up, check the plug ejected, then re-punch only if needed.
If you need very clean holes for visible hardware, a drive punch plus good backing often beats a rotary punch even if it takes longer.
Self-check: diagnose your hole problems in 60 seconds
If your results look inconsistent, don’t guess. Use this quick checklist to narrow the cause.
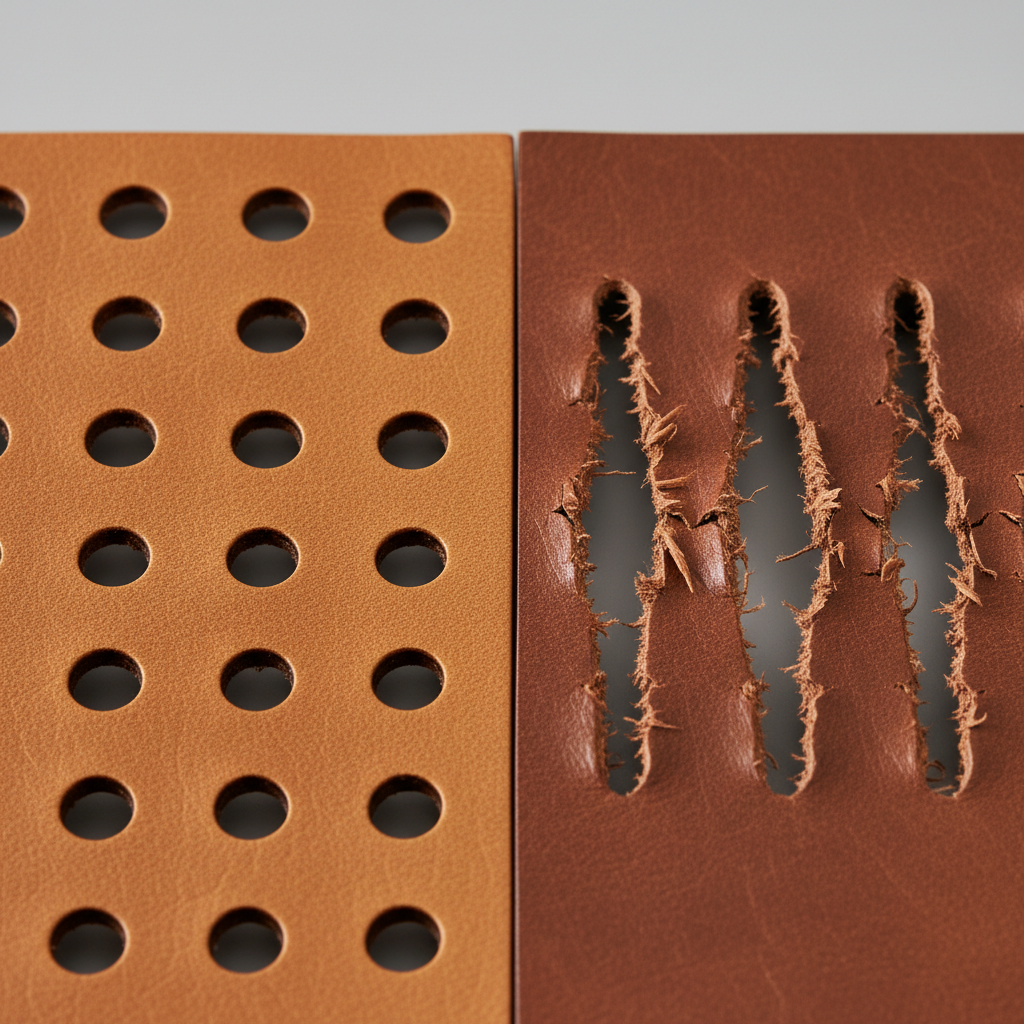
- Hole edges look fuzzy or torn: backing too soft, punch dull, or you’re rocking the tool.
- Holes look oval: punch not vertical, rotary punch tube not centered, leather shifting under pressure.
- Spacing drifts over a line: marks not anchored (no divider line), measuring from a moving reference edge.
- Hardware won’t fit: hole too small, leather swelling from compression, or hardware spec differs.
- Leather wrinkles around hole: too much force on thin leather, no backing support, punch too large for the area.
Practical workflow for repeatable, professional results
Here’s a workflow that stays fast without sacrificing accuracy, it also scales from one belt to a batch of small goods.
- Test first: punch in scrap using the same leather thickness and layers, then test-fit the hardware.
- Mark a reference line: use a wing divider or ruler so every hole shares one visual baseline.
- Punch from the grain side: many crafters prefer entering from the “good” side for cleaner presentation, then check the backside for blowout.
- Stabilize stacks: for folded tabs or layered straps, clamp, tape, or use double-sided tape before punching.
- Deburr if needed: a light touch with sandpaper, edge beveler, or burnisher can tidy fuzzy fibers, especially on softer chrome-tan.
Key takeaway: consistency comes more from setup and marking than from raw hand strength. If you’re forcing the tool, something upstream is off.
Care, sharpening, and safety notes people skip
A punch that cuts cleanly is also safer, because you’re not compensating with extra force. This part feels boring until you ruin a strap right before gifting it.
Maintenance basics
- Keep tubes clear: plugs stuck inside the tube cause partial cuts. A thin awl or scrap wire clears them.
- Light oil on metal: helps prevent rust, especially if you store tools in a garage.
- Sharpen when cutting feels “squishy”: many drive punches can be honed with fine abrasive paper wrapped around a dowel, or a dedicated sharpening cone.
- Replace damaged tubes: chipped edges will tear leather, no technique fixes that reliably.
Safety and material cautions
- Wear eye protection when striking, fragments and plugs can pop up unexpectedly.
- Keep fingers away from the strike line, use a punch holder if you’re nervous or working fast.
- If you’re punching unknown leather (old belts, treated hides), odors and dust can be irritating, good ventilation helps, and if you have sensitivities, consider asking a professional for material-specific guidance.
Conclusion: make your next set of holes look clean on purpose
Once you understand how to use a hole punch for leather crafts, the process stops feeling like a gamble and starts feeling like a repeatable routine: pick the right punch style, mark with a consistent reference, support the leather on a proper backing, then punch straight with controlled pressure.
If you do one thing after reading this, do a quick scrap test and adjust the tool choice or backing before touching your real piece, that single step prevents most of the frustrating “why does this look messy” moments.